Powered By Blogger

Pages

Wednesday, March 28, 2012

Something From Nothing ~ Week 13


This week, I had the final "pork steak" from my big freeze-a-thon back at the end of January ready to go....I do try for a 60-day rotation on frozen meats...and it was time for this to be used up. The only real question of course, was....what do I make with it?  I chose a really challenging one for this weeks' post, and decided that this one piece of meat....


...was going to be dinner....AND an appetizer! How, you ask? Asian food! I knew there would be enough meat there to fill some pot stickers, but wonton soup, too? I must be nuts! On the other hand, I had these in the fridge, and they were rapidly approaching the "use me up or feel guilty about throwing me away" stage....


First, I removed the bone from the pork steak, all the fat, and cut it into chunks (kitchen scissors - yay!) I then scoured the pixie-pantry and refrigerator for suitable ingredients and found;
green onions, cornstarch, soy sauce and sesame oil, cabbage, garlic and ginger. We are in business!


After a minor chop, I threw the meat, scallions, ginger, garlic and cabbage into the food processor...


Then, about 2 Tablespoons of cornstarch, a teaspoon each of sesame oil and soy sauce...


Pulse this until blended, and the ginger and garlic are in small enough pieces...Now, prepare your work area for filling these yummy pockets of goodness. I got out a plate, and sprinkled on some cornstarch (so the pot stickers don't become plate-stickers hardy-har), a small ramekin of water for wetting the edges of the dough, the now-blended meat mixture, and of course, the wonton skins.


Now, take a regular teaspoon, and place about a half-teaspoon of filling into the center of the wonton skin and wet the entire border with your fingers after you dip them into the bowl of water ...like so...


Fold it over to make a little triangle....


Then, crimp the top in a decorative, but more importantly, well-sealed manner. Like this little packet of goodness!


As you finish each one, place them on a plate dusted with cornstarch, and cover with a damp paper towel, so they do not dry out. Here's all my little soldiers..lined up and saluting!


Now, take the remainder of the filling, and as you fill the wonton skins, pull all the corners up into a little pouch, squeeze hard to seal, and press down slightly. You will now have wontons, as well as pot stickers!


Continue until all the filling is used up, and place on a plate in the same fashion as your pot stickers.  Here are mine...


After I took this photograph, I immediately froze half the batch...for a busy, work night Chinese take-out meal without the cost, or paper boxes, or even a reservation!

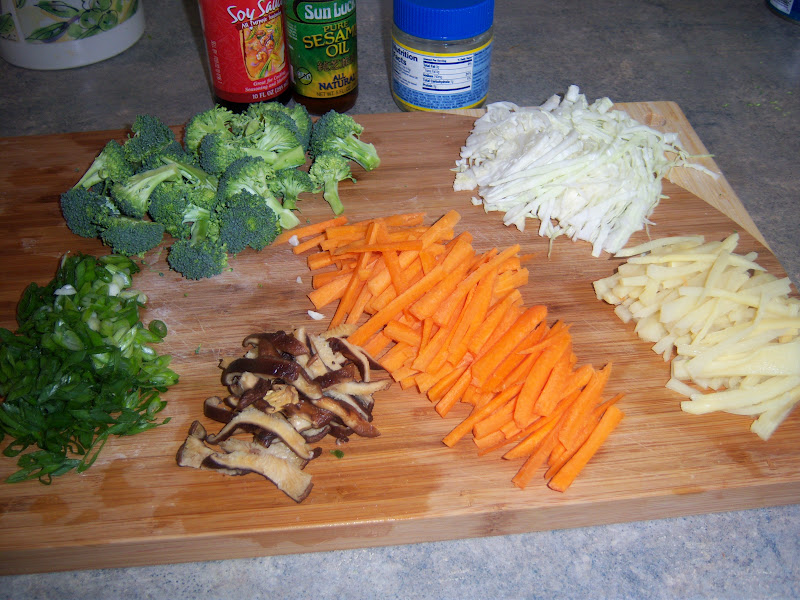
I got out a few more ingredients that I had on hand to make the wonton soup. They are;
Carrot, scallions, dried shittake mushrooms, broccoli, chicken base, bamboo shoots, cabbage, and the soy sauce and sesame oil from earlier.


I soaked the mushrooms for about 10 minutes in really hot tap water, then sliced everything in a similar manner. This keeps everythings' cooking time the same, and looks attractive in the soup bowl. 


Now, fill a 3 quart saucepan three quarters full with water, and only add about 2 Tablespoons of chicken base. Asian soups have very light, delicate broths. Add a Tablespoon each of soy sauce and sesame oil.  Everyone but half the scallions, the broccoli, and the wontons goes into the broth.


Cover and simmer on medium low for about ten minutes, until the vegetables are tender. Then add your wontons and simmer for ten minutes longer. Finally, add the broccoli and garnish with thinly sliced scallion. Simmer for 5 minutes and turn it off....keep it covered while you finish the pot stickers. Here's the fun part - while the soup is simmering, place 1/2 cup of water and one tablespoon of vegetable oil in a skillet. Add your pot stickers, cover and steam for about ten minutes.


Then remove the lid (medium heat), and as the water evaporates, the oil remains, and gets those lovely crispy brown bottoms going on the pot stickers. This takes about five to ten more minutes...they are done when the water has all evaporated, and the bottoms are brown and crispy, but not burnt. Pick them up and check them, if you need to - it won't harm a thing!


Don't worry about the water looking a little "milky" - that's just from the cornstarch on the bottom of the wontons.  Now, pour some soy sauce into a bowl, add a little vinegar, scallions and sesame oil, and you've got your dipping sauce. The results?  Just amazing. Have a look!


And...


And...


An appetizer, and lovely, warming wonton soup. All from that small piece of protein, and a few bits and bobs from your pantry and refrigerator! I won't tell you how incredibly good it was, because I can already hear your car tires squealing as you race to your local Chinese take-out. Stop it at once! Go MAKE it!

What is your favorite Asian dish, that you duplicate as well as, or better than the local take-out?

Eat well, my friends and stay tuned for our next Something From Nothing, and see what those naughty, naughty little Kitchen Angels have been up to.

Love and kindness to all,

Pixie

Thursday, March 15, 2012

Something From Nothing ~ Week 12

As you know, four days after putting my Kimchi down in the cold cellar, it was time to put it in the fridge...this is what it looked like...


Honestly...I was a tad afraid to try it...something that had not been heat-processed, was it safe? What would it taste like? Undaunted, I speared a crispy piece of Napa cabbage leaf, and dug in. Not only did I not get sick....I'm hooked! The stuff is, quite simply, addictive! In fact, I'm going to go make me a small bowl to snack on while I write this post....be right back! Now, although I'm sure that this condiment will have some percussive side-effects, I cannot stop eating it! Going to have to make Korean barbecue now....just to have an excuse to eat more of it!

On to todays' subject. I had some beautiful natural almonds to use up, and although I could have simply snacked on their crunchy, healthy goodness, I was actually CRAVING the warm, almond-y buttery bear claws I remember from my youth. There was no way I was going to shell out ten bucks or more for a tiny tube of marzipan (almond paste)...so the solution was obvious. Make my own almond paste, then make bear claws with it! Click here for the bear claw recipe I used. Here are the humble beginnings...


Now, get the rest of your ingredients in order...


Lemon, yeast, butter, egg, cinnamon, salt, sugar, flour, milk, and brown sugar...then, the almonds....take about a half a cup of these beauties...


And blanch them in some boiling water for about two to three minutes...


Drain them in a colander & place on a clean kitchen towel...


I had always feared blanching almonds....never again! The skin of the nut just pops right off!


In the meantime, scald your milk, and add the butter, sugar and salt...


Now, place the yeast in the lukewarm water to bloom for a moment..


Add the egg, the milk mixture and half of the flour..


Mix to make a wet batter...then, incorporate the rest of the flour to make a stiff batter, and place in the fridge for two hours...


While it is chilling out, make your almond paste....buzz those blanched almonds with a little sugar and vanilla until it turns to a paste...


Easy, right? Now just combine with the butter, lemon rind, brown sugar and cinnamon...


I then microwaved this filling mixture for about a minute, just to make it soft...


Getting closer to bear claw tasty pastry time! Remove your dough from the fridge, and divide it in half.


Roll out onto a floured board, to approximately nine inches by eighteen inches. Don't get too scientific with it...note, I did not get out my ruler and measure this, and it still worked just fine!


Now, put dollops of your filling mixture evenly on top of your dough...


And, beginning from the bottom, fold up one third...like so...


Then, fold that top half down over the side you first folded up...


You get a kind of pastry burrito! Now, cut into approximately two-inch wide pieces..once again, if you are into extreme uniformity, go ahead and measure...I really am unconcerned about my little bear claws being all the same size...hey, nature has different-sized bears, right? :)


Now, cut those with small slices to make the "toes" of the bear claw, and place on a greased baking sheet...


They are sooooo cute! Now, beat an egg yolk with a little water, brush on the tops, and add some sliced almonds, and granulated sugar (optional).


Now, the torturous part...let them rise...for ANOTHER hour! I know, I know...but it will all be worth it on that first bite! Here are mine after that looooooong hour, and ready for the 400-degree oven...


Bake for approximately eight minutes...and watch closely, those little claws can burn on the bottom, at that high of a temperature....the results?


Un-BEAR-ably good! (you knew that was coming!) And, eating them warm, right out of the oven? Priceless, as the advertisement would say. 

What do you bake that takes you right back to childhood?

Eat well, my friends, and stay tuned for more fun that will include the Korean barbecue meal, and a visit from those fine young ladies, the Kitchen Angels! Now, go bake something!

Love and kindness to all,

Pixie


Sunday, March 4, 2012

Something From Nothing ~ Week 11


Why yes, yes I know it has not been a complete week since my last post! However, I have many, many weeks to catch up on. This project must have fifty-two weeks, to be precise.  Sooooooo...on we go!  While watching food-related TV recently (what else is new?), I saw Guy Fieri making an Italian-style stuffed flank steak, and knew I must make it. Although not an authentic Italian dish, I have always loved flank steak, and was in the mood for what I call "project level cooking" - in other words...lengthy, prep-heavy, and ultimately, tasty.  Click here for the recipe. First, we get our flank steak on a plastic covered cutting board...


Then we carefully butterfly it open....carefully because this cut of meat is very thin to begin with.


Then, we cover with more plastic wrap, and (wait for it...) beat our meat senseless with a meat mallet. Hey, I can't help it...it's part of the recipe! Really!


Back to the prep work.  We assemble the following....


Carrots, scallions, onion, garlic parsley, salt, pepper, Italian seasoning, white wine, tomato sauce, liquid smoke, mozzarella cheese, a jar of roasted red bell peppers, chicken stock, flour, sun-dried tomatoes in olive oil, and wooden (bamboo, of course) skewers. Not shown, more extra-virgin olive oil for searing the beef in.  Whew! Hey, I told you this was project-level cooking! Now, we prep...


Shred the mozzarella, chop the parsley, onion and garlic, and cut the carrot and scallion into julienned pieces. Then, gently saute' the garlic and onions in extra-virgin olive oil until tender and translucent..


Now we get to the fun part - building the dish! Lay down your carrots, scallions and roasted red bell peppers (diced) in an attractive manner along one side of your butterflied steak...


Then, add your sun-dried tomatoes.  These may not look like your typical, store-bought sun-dried tomatoes...because they are not! I make my own..it's easy! Simply slice tomatoes, place on a baking sheet with a little olive oil & kosher salt, turn the oven to 200, and let them go for several hours.


Now, add your garlic and onion mixture, once it has been cooked and cooled down a bit..


Finally, add your shredded mozzarella, the parsley, and some salt & pepper...


Now - the scary/tricky part. Roll that bad boy up! Don't be intimidated...YOU are in charge! Here is mine, mid-roll...


You may have holes, tears in the meat...do not worry, you can skewer those shut, and it will come out just fine...here is mine at the end of the rolling, and skewered to close the seam...


Now, I got my handy-dandy appetizer tray out (funny how useful that thing is), and put the flour and Italian seasoning down, to mix and coat the meat in..


Then, roll that steak around in it...to coat completely...


Get some olive oil really hot, in your largest skillet, and sear the meat until browned on all sides...


Now, here is where I deviated from the recipe. Honestly, placing it in a 300-degree oven for only 15 more minutes did not cook it to the desired doneness. 350 for a half an hour is more like it....here is mine, going into the oven for the final roasting time...


Now, we add white wine to the skillet we browned our meat in, to deglaze and get up all the wonderful flavor from the pan...


Then, add your tomato sauce, chicken stock, and a quarter of a teaspoon of liquid smoke. Frankly, I never buy "fire roasted" tomato sauce, because any "smoke flavor" is lost on me, and the products are typically more expensive than regular tomato products. Here is the sauce, beginning to reduce...


While the sauce was reducing, I mashed the potatoes, and pulled the steak out of the oven to rest. When the sauce had thickened and the meat had rested (about ten minutes), I sliced it carefully and plated up with mashed potato and sauce.... The results?


Absolutely delicious! There are a few issues with the recipe that I would definitely modify next time.  I would steam the julienned carrots a bit, as I did not like them remaining crunchy (curiously, Dear Husband actually DID like the crunchy carrots), and clearly, the cooking time needs to be longer. All in all, though...a very tasty dish indeed.

Eat well, and try new recipes my friends....it is so worthwhile to discover a new taste! Stay tuned for some bear claw pastries, and we will check on our Kimchi.....

Love and kindness to all,

Pixie