Powered By Blogger

Pages

Thursday, March 24, 2011

The Attack of the Rubber Chicken! ~ Part One

No, not THAT kind of rubber chicken! Not the novelty store goofy-looking bird...what I mean is a truly stretchable, prodigious poultry product. Recently, while riding a wave of thrifty-ness, I wondered if I could get three meals, a snack, and stock out of one...just one chicken. What follows is photographic proof that it can, in fact, be done.  Keep in mind, that if you work for a living, this endeavor must be a weekend thing, unless you are fond of staying up all night cooking.  First, take a fresh, plump, healthy-looking bird, and send him to the showers...


That's right.....gives the phrase "bird bath" a whole new meaning! Pat him dry with paper towels, and remove the little "fun baggie" containing the gizzard, heart, liver and other offal. More on that in a moment...rinse the inside of the bird, as well.


Now, line your work surface with parchment paper, plastic wrap, or what you have on hand, to make clean up easier later, and grab ye some kitchen scissors or poultry shears. WHAT? You don't HAVE those? Oh....my....gosh. Put that mouse down and RUN, don't walk, and buy them, immediately. I cannot even emphasize enough what a treat it is to have these in the kitchen. When I think of the endless hours I spent painstakingly hacking wings in two (for buffalo wings, for instance), I want to scream remind everyone what a time-saving, invaluable tool it is, indeed.


For dissection 101...begin by removing the legs by cutting downward at the point where they meet the body of the chicken, like so...


Pull them back from the body, and cut off, including the thigh...(squeamish readers and vegetarians may be excused from the classroom now).


Separate the drumstick from the thigh by simply looking at the leg, and slicing appropriately...you know what a drumstick looks like, right? Okay then, be confident!


And....unless you have some sort of mutant bird on hand, you will be left with exactly two...that's right, two drumsticks, and two thighs.....exhibit "A"......


Take those wonderful scissors, and snip off the wings, right at the shoulder joint....


And, easy as pie, snip them in two...reserving the very tips for your chicken stock...


Let's deal with what is left of the bird..take your knife, and run it under the rib cage, to separate the breasts from the rest of the chicken.


You will then have the remains of the bird, and the breasts...separate them with your shears


Then, take your shears...and cut the whole breast into two...right down the center...


Pull the skin off, and voila! You've got chicken breasts!

Take your (lovely and sharp, I'm sure) knife, and run it under the bones, to make the breasts boneless...don't throw that away...that's for the stock!
Now you have a properly parted-out chicken...

Two of everything, dontcha know. Now, prepare yourself for the icky bits....the bits that are going to make delicious, flavorful chicken stock. 
You've got the wing tips there, the back bone, the heart & gizzard and those rib pieces from the breast. Keep the liver aside, and freeze it, to make something else with...it is too strongly flavored for stock. Place all the icky bits into a stock pot with cold water...and plenty of it, too.


Then, take these ingredients...an onion stuck with three cloves, a few teaspoons of kosher salt, celery, parsley, carrot, whole peppercorns and bay leaf and.....


Add them to the pot. No, you do not need to cut up the celery or carrot....they came to the party just to give their flavor. Place them in the pot, and bring to a boil...

Now, where was that snack? Oh, yes...first brown up those wings...

Add butter, hot sauce and cider vinegar....


Let them bathe in that buffalo sauce for about eight minutes on medium heat, then, throw them in the grill pan, to get a good crisp on both sides..

Mix these ingredients...Two tablespoons each of mayo and sour cream, a teaspoon of worcestersauce, and a couple tablespoons of blue cheese
Mix in a little bowl. Or in the case of this Pixie, a little ramekin....hey, it's only me here....remember our Pixie-Portions now, so we do not pack on the poundage..


Place on plate with celery sticks, and a pretty celery leaf garnish...and enjoy while your stock is starting to come to a boil.


Delicious! Now, back to the job at hand....the chicken stock. In most recipes, you will read the phrase "skim the scum off the top when the stock starts to boil". This....is what it looks like..


And when it is too fine to be scooped up with a tablespoon, I go straight to a fine mesh sieve, like this....


When all the "scum" has been skimmed, and your stock is sufficiently bubbling away...this is how clear it should look....


It's a little hard to see with all that steamy goodness going on here, but you get the drift...there should be no more foamy stuff at the top. After a good hour of simmering (add water if it gets low, and partially cover to avoid losing more liquid), recipes tell us to strain the stock, while pressing hard on the solids. Here's how I do it;


With a wooden spoon, in a flexible colander, over another pot. Once strained, place in the refrigerator to cool overnight. Look at how much stock this one birdy made!


I needed a cup of chicken stock for the recipe I made that night, so I kept it in the measuring cup in the fridge...ready and waiting for me.  Why do we refrigerate the stock overnight?  See if you can guess by looking at the "after refrigeration" shot.

That's right...we skim the remaining fat off the top, then freeze in one or two-cup portions for our recipes. But, you knew that my little Pixie smarties! Right? Thought so.

What "basic" recipe did you think you had down pat, and then found out later, that you were missing something? A step? An ingredient? Did it turn out just as well, anyway?

Stay tuned for how we continue after stock and a snack...to make THREE WHOLE MEALS out of our wonderful, rubber chicken. AND....a visit from Kitchen Angel...and, just a hint...the first meal out of the rest of our bird, also had THIS involved....


A romantic, dinner-for-two shrimp cocktail appetizer...with a twist! I'll tell you what that twist is next time! Eat well, my friends, and stretching a chicken means you stretch your dining dollar, too. Love and kindness to all,

                                                                         Pixie

Monday, March 21, 2011

An Honest Loaf

Yes, I did actually make Italian ciabatta bread, from scratch! It was an interesting process, as I thought that the day I started the bread, I'd actually be eating it....BUT NO. First, one has to make the "sponge" which is kind of a misnomer in that it is simply a mixture of yeast, sugar, water, and flour (like a sourdough starter, for instance), and you have to let it sit overnight to boot! Here is the "sponge" after mixing, and getting ready to spend the night on my counter - covered with a clean dish cloth...


Now it is the second day, and like all good Pixie-cooks, I've got my ingredients ready to go for the bread...


The "sponge" gets mixed in with some flour and butter in the mixer....


As well as some more yeasty beasties....which have been blooming in some warm milk and sugar.....


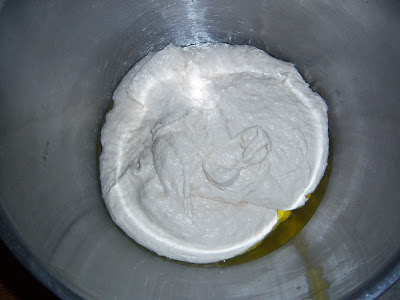
Then, the fun actually begins. Mix all until it comes together as a dough...like so....


And, when making doughs, and the recipe says to mix until something has come together and is leaving the sides of the bowl clean.....this is what it looks like....


Then, into an oiled bowl for a first hour-and-a-half long rise....


I covered with the clean kitchen towel, and left in a warm, draft-free place while I went on about my day.  Then, you shape them into the standard "slipper" shape (ciabatta means slipper, in Italian), and let them rise again...for about another hour or so.....


At this point, I was thrilled! It was finally getting to look like bread!  Then, into a very hot oven, on a (seriously splooged on) pizza stone for the baking time.....


They were so lovely and large at that point, I could only bake one at a time! Then, the moment I had been waiting and working for.....let there be bread!


Another close up of these beauties.....


And of course, the shot I enjoyed the most.....the slice, warm from the oven, touched with a pat of butter, and ready for yours truly to devour....


The sweet, chewy crust was amazing! What real bread should taste like, everyday. The interior was soft, but not too soft, and made it a perfect bread for soups, sandwiches, bruschetta, and many other uses. When the last of the two loaves got a little stale, I cubed it and placed it into a zip bag, and later blitzed it up in the food processor with herbs & Parmesan and voila! Italian bread crumbs!

What dish takes you more than one day to create? Is it a family tradition? Is it worth the taste and satisfaction you get from making it?

This bread was so amazing, I have zero problems, from this point on, making the sponge while I am preparing supper, and baking the loaves the next day! Eat well, my friends, and stay tuned this week for THE ATTACK OF THE RUBBER CHICKEN!! And, we'll touch base with Kitchen Angel, and see how she is enjoying Spring! Love and kindness to all,

                                                                        Pixie

Wednesday, March 16, 2011

A Spring in her Step

I may never actually get to post about the Ciabatta bread. To be honest, it was kind of a boring photo shoot...dealing with bread dough and yeast mixtures is about as exciting as watching the grass grow! I will, however, show you some amazing things that have been going on here lately in Pixie Land, and prepare you for the now infamous "Rubber Chicken" post!

Recently, while the rest of the known universe is about to enjoy the freshness of Spring, and a renewal of life-affirming prospects...I went the other direction. Although I was and am thrilled to have left the frozen tundra of Alaska, I have recently experienced a huge sense of loss, concerning my friends, my steady paycheck, and other items I had to leave behind, to begin anew here. I will not go into the boring details, save to thank my Mom, my Sister, and my friends for always being there when I needed to sound off. Thank you for attending my personal pity party, for understanding that even the most charmed life can have it's down-trodden moments. Mostly, for believing in me, and encouraging me to continue to do what I do. Dear Husband deserves the same thanks....

Since I was in the midst of such a funk, my family spoiled me with some care packages containing items not readily found here in beautiful West Virginia...and I'm enjoying them all immensely. One of those care packages contained a lovely jar of marinated artichoke hearts, and I wondered what to do with them. A healthy salad lunch, of course!

I laid the artichoke hearts on top of some regular iceberg lettuce leaves (the crunchy innermost part, my favorite!), and then placed thinly sliced red onion, red bell pepper, goat cheese and pine nuts (also in my care package) over the top. I sprinkled with some extra-virgin olive oil, and a splash or two of some nice balsamic vinegar, and there you have it. 

The Rubber Chicken post is a personal challenge I recently undertook to take one chicken, disassemble it into its component parts, and make it last for 3 meals, and chicken stock. See how I did, soon!

The salad was, and is...delish! Thanks once again to all who came to me in my moments of need, and kept me feeling needed, and happy.  Eat well my friends, thank those who are behind you no matter what, and stay tuned for the Rubber Chicken experiment! Love and kindness to all,

                                                                       Pixie