Yes, I'm finally getting to that luscious and decadent sweet treat. I was intrigued when I saw Giada DeLaurentiis making these, and simply had to duplicate them! click here if you'd like the recipe. This is not a recipe for beginners, or those who are short on time. In fact, I normally shy away from the baking/candy making arts, but it IS Fall, after all! I did not use the smoked sea salt on top, but that is optional... As always, first we prepare by making sure we have all the ingredients at hand, and at room temperature...
Clockwise from bottom, chocolate chips (semi-sweet), butter, instant coffee, graham crackers, white and brown sugar, and heavy cream. Not shown, additional butter. And yes, this is not a recipe for people watching their diets.....but an occasional splurge is what makes life so sweet, so....darn the torpedoes (or spare tummy tires) and go for it!
First, make sure you have the proper equipment. When attempting something that is difficult, or gourmet, or project-level cooking, I cannot stress the importance of this enough. Trying to "make do" in this situation will probably end up with a failed dessert, and waste of spendy ingredients! Here is the first necessity.....a spring form pan..
You open it up, and lay the insert on to a piece of parchment paper. Take a pencil and draw the circle, using the insert as your guide. Then, you cut the circle, place it into the reassembled pan, and spray with a non-stick cooking spray. Spray the sides of the pan, also...then, you'll actually be able to remove the bars, later! A little fussy, but not difficult....that part is later, lol.
Now that you are ready.......we cook! First, buzz the broken-up graham crackers with the white sugar in your processor....until they are the texture and size of fine breadcrumbs...just like you'd do for a cheesecake crust.
Then, melt ye a stick and a half of butter....
Then, combine the two, and press on to the parchment paper bottom of your spring form pan.
Bake as per the recipe, until golden brown, and set aside...this is what it should look like when it comes out of the oven.
Now we begin the hardest part of the recipe....not that it takes any special skills, mind you, one just must have a candy thermometer, and make sure that you can devote your full attention to this part. I have several sugar burn scars on my hands that can attest to the dangers of cooking with caramelized sugar! Get the cream, additional butter, and brown sugar going in a saucepan...
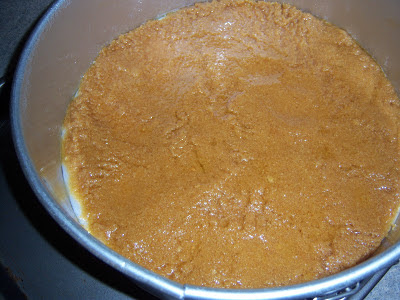
Now, place your candy thermometer into the mixture, and keeping the mixture bubbling along at a good clip, but not boiling over (see burn comments, above, ahem...), cook until your thermometer reads 240 degrees. The recipe states that this should take 5 to 7 minutes. Mine took longer, as I was very cautious about boiling caramel! Here's what the death cauldron, um, caramel looks like, as it neared the 240-degree mark...
Yes, that's a hucka-hucka burnin' love right there! Immediately after you have reached that magical caramel-forming temperature, carefully.....and without kids, pets, or torchable skin nearby......pour on top of the semi-cooled graham cracker crust. Here's how that layer looks...
Get that saucepan and candy thermometer soaking in some hot tap water straight away....unless you LIKE scraping off hardened caramel, later....why no, I don't have close personal experience with that...how dare you think so! (wink-wink). Now, pop the whole pan into the freezer for ten minutes, to firm up, sigh with relief (the hard part is over), and make the chocolate layer....
Melt the semi-sweet chocolate chips into the heavy cream, in the top of a double boiler (mine is always just two saucepans, one inside the other) over simmering water...stirring frequently until the chocolate is melted...
When the mixture is smooth, and all the chocolate chips are melted, stir in your instant coffee (or espresso), and incorporate into the mixture...
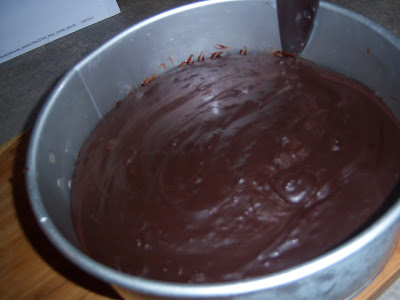
Yummmm....starting to look chocolatey-delicious! Now, remove your spring form pan with the first two layers done, from the freezer, and pour the chocolate right on top of the caramel layer....
At this point, I tapped the pan gently on the counter to settle the chocolate, and release any air bubbles. Guess what? You are done! Pop that lovely dessert in the refrigerator (for at least an hour), and go do what I did.....clean everything so that A: you are not scraping hardened caramel off everything for hours, and B: You actually have a clean kitchen to prepare your supper in!
When the dessert has chilled for at least an hour, take it out and let it sit on the counter for 30 minutes. I took mine out as I served supper....now here is another tricky part, but if you follow the instructions on the recipe, all will go smoothly. Wet your sharpest cutting knife with hottest tap water, wipe it dry, and gently run around the edge of the pan...encouraging the chocolate to separate...
Now, we plate! Unhinge and open your pan, remove the bottom (the crust will be firm), and peel off the parchment. Place the whole disk on a cutting board, and cut into serving-size bars. Warning....this is so rich, even the most die-hard sweet tooth may only be able to eat one small bar at a sitting! My results?
What can I EVEN say about this treat? They are unbelievably delicious! Incredibly rich, chewy from the caramel layer, crunchy from the graham cracker layer, and creamy from the chocolate layer....every texture and taste that you could want in a sweet treat. My sweet tooth is small, however, and I can only manage about half of one of these!
A worthwhile, though not beginner-level dessert...that is still in my fridge (in an airtight plastic container), for when we have a sweets craving. Stay tuned for the soon-to-be famous "bowling banquet beans", a gourmet supper, and those sweet little Kitchen Angels. Eat well, my friends.
With love and kindness to all,
Pixie


No comments:
Post a Comment