Powered By Blogger

Pages

Wednesday, June 29, 2011

Leftover Magic ~ Part Forty-Two

Actually, I'm not quite sure how many "leftover magic" posts I've done, or will do....I just like saying "Part Forty-Two".  As you know from Monday's "Broccoliflower" post, I've got some leftover cheese sauce in the fridge.....and, as it turns out, some elbow macaroni!  Talk about propitious timing! As it turns out, I've got a special guest coming to visit, and need to get a LOT done today!  You know what that means, right? That's right, no time to create a gourmet lunch, AND I NEEDS ME SOME CARBS FOR ENERGY!! Basic science tells us that the body turns foods with complex carbohydrates into the stuff (love that medical term!) that gives our bodies energy. Along with paying attention to nutritional balance and hydration, of course....so just like a long-distance runner, I must carb-load! First, I got the two all introduced to one another....


You would not believe how quickly this dish comes together. I then added to the party with; salt, pepper, Parmesan cheese, Panko bread crumbs and parsley & tarragon from the Pixie-Patch. I preheated the oven to 375....


Then, I literally just dumped the noodles into a favorite small casserole, emptied the cheese sauce on top, chopped the herbs, grated a little Parmesan, and put it all on top with some salt & pepper.


Just mix all together until smooth....and even out the top with your spoon...


I topped with enough Panko (Japanese) breadcrumbs to make a nice, even layer..and dotted with a little fat-free margarine....


While the mac & cheese goodness baked, I mixed some arugula lettuce with good-quality olive oil,  a splash of dark, sweet balsamic vinegar, and a pinch of kosher salt. Remember your greens! Oh, and nutritionally speaking, the darker the green, the better it is for you....


After approximately 15 to twenty minutes, when the bread crumbs on top have turned a light golden brown, pull out your macaroni and cheese, and let cool for a few minutes to set up...


The results? Well, let me just say that after this lunch, I hung pictures and curio cabinets, installed a window blind, unloaded and loaded my dishwasher, and ran and put away two loads of laundry. All before prepping for supper! Carb-tastic! Here's the yummi-ness...


I love that Panko breadcrumbs stay crunchy after baking. The arugula salad was the perfect crispy foil for the richness of the pasta dish.  The tarragon was an inspired touch, I think I am going to have to use it in my macaroni and cheese from now on!

What is your go-to lunch when you need energy, but don't have loads of time?

Eat well, my friends. Love and kindness to all,

                                                                          Pixie

Monday, June 27, 2011

Broccoliflower

Yes, I know it's not a real word, already! However, certain family members...and you KNOW who you are, have been tempting me with thoughts of delicious cruciferous vegetables with cheesy sauce. Now, all you cooks out there in Pixie-land just KNOW that you cannot tempt a cooking nut with a tasty treat, and expect her NOT to make it, now...can you? That's right, I knew you'd see it through my admittedly rose-colored glasses. So, my problem became just which vegetable I could blanket with sauce....what to have. broccoli or cauliflower? Well, like all good Portuguese-American Princesses (oh Lordy, I'm a PAP!), I knew the answer straight away...BOTH.

So, I quickly put 1/2 inch water in the bottom of my large pan, and got the florets ready for steaming....


Then, although I wanted cheesy goodness, I did not want the full fat content of whole milk, or butter. So I made a roux with fat-free margarine and flour. The 2-2-2 rule applies again, Two tablespoons of butter, two of flour, and two cups of liquid. Here's the start..


When the butter and flour were incorporated, I gradually added two cups of vegetable stock, and whisked to combine. Stir frequently over medium heat, until the sauce has thickened a little, like so.  At this point, steam the cauliflower and broccoli - watch it closely, no one likes mushy veggies!


Now, the fun part..clockwise from upper left, salt, pepper, hot sauce, cayenne pepper, brown mustard and a plate with a little sharp cheddar, Swiss, and goat cheeses.


Turn your heat to low and add some salt & pepper, about 1/2 teaspoon of hot sauce (more for color than any real heat),  the cheeses, a sprinkle or two of cayenne pepper, and about a tablespoon of brown mustard...whisk all together to make a smooth, thick sauce.


When all the cheese is nicely melted into the sauce, turn the heat off, and prepare your veggies...I like to assemble them in a manner similar-looking to how they grow - behold the wild and un-stalk-able broccoliflower...


I know, I'm strange like that! Spoon some of the sauce over the top, sprinkle with a little more cayenne if you like, and enjoy!


Although there may be serious, apocalyptic consequences later (ahem), I just adored how cheesy and delicious this was, knowing that it was made with non-fat margarine, and vegetable broth. Proof positive that one CAN have one's broccoliflower, and eat it too.  The best part was....having all that leftover cheese sauce....hmmmmm, now whatever am I going to do with that? Stay tuned.

Eat well (and healthily) my friends. Love and kindness to all,

                                                                             Pixie

Thursday, June 23, 2011

Stuffed

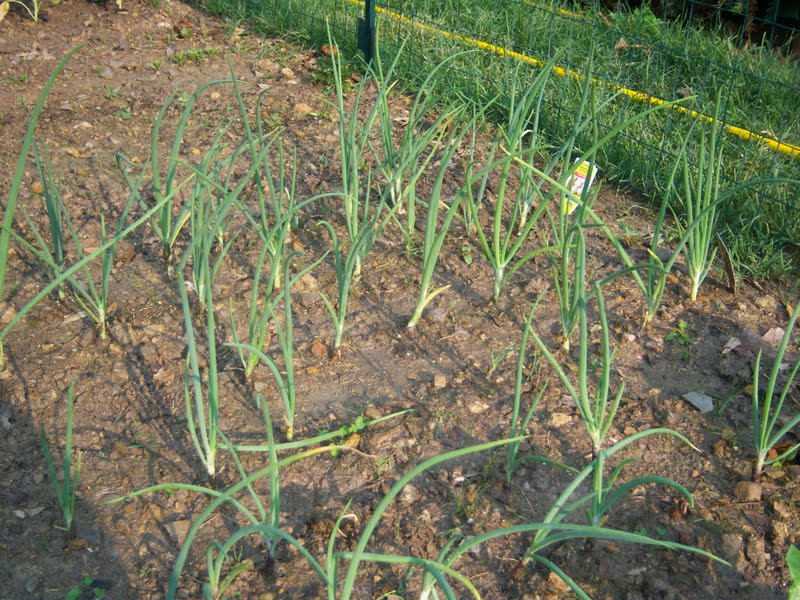
Back in the Pixie-Patch, the lettuce is getting ready to take over, and demand a bigger share of the garden plot...no, really! See how much of it I picked just today?


Something other than salad had to be done. After pulling out my go-to book when it comes to produce from the garden that is threatening to take over (The Victory Garden Cookbook), I discovered a marvelous use-up recipe for the lettuce!  As you know, I adore ethnic foods of any kind, and the recipe I found was an adaptation of Greek stuffed grape leaves (Dolmades, or Dolmas), that used lettuce, instead of the grape leaves. I thought it was an inspired idea, and set about making it.  First, one cooks rice for five minutes (blanching)  in boiling water, just to partially cook it. I used chicken stock, however, water or vegetable broth would work quite nicely..here's mine getting its "blanch" on....


Then, we drain the rice, and save the broth, as we will have it to pour over the stuffed leaves, later....


Then, we ever-so-quickly (one minute) blanch the lettuce leaves in boiling, salted water...here's how fast that one went....


I quickly ran them under cold water to stop the cooking, dried them, and neatly stacked them to prepare for filling - it was a delicate, fiddly business, but worth it because when it came to stuffing time, I simply peeled the next leaf off the stack...


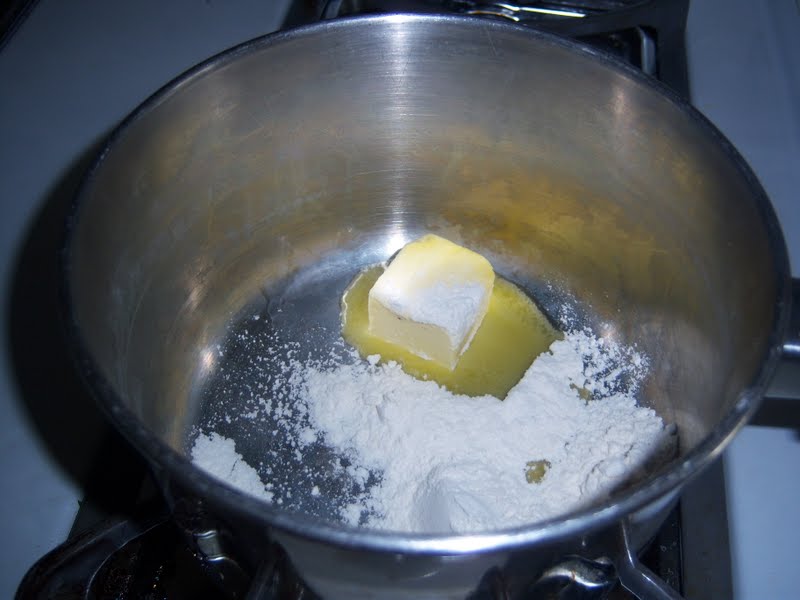
Okay...our rice is blanched and draining, our leaves as well, time to get our "stuff" together for our stuffing...hahahaha...clockwise from bottom left, finely chopped walnuts, onions, butter, sugar (organic), lemon juice (salt & pepper in the center), the lettuce leaves, and fresh dill and parsley from the garden, minced fine.


The onion gets sauteed with the butter, sugar, salt & pepper. I thought it looked like too much pepper, then remembered that it has to season all that rice in the stuffing!


Then, we combine the now-tender onions with the drained rice, and all other ingredients except the actual lettuce to be stuffed...


Now comes the tricky/fun part....lay the leaves, one by one on a plate, and spoon in a generous teaspoon of the filling...remember that the rice  will expand as it cooks...


Place it on the wide end of the leaf, like this.....


Roll up the sides, so that the rice is concentrated toward the middle of the lettuce leaf....


Then, gently roll it into a tight little bundle-o-flavor, like this...


Continue on in this fashion until you are exhausted and your fingers want to drop off, all are finished, and place in the same (cleaned-out) pan you used to saute' the onions in, no need to dirty additional cookware!


They are not perfect...but I don't care, they are to EAT! Carefully pour water, chicken stock, or vegetable broth down the sides until the little rolls are just barely covered, and simmer for thirty minutes until the rice is cooked. Lift out with a slotted spoon, and place on a plate to cool.


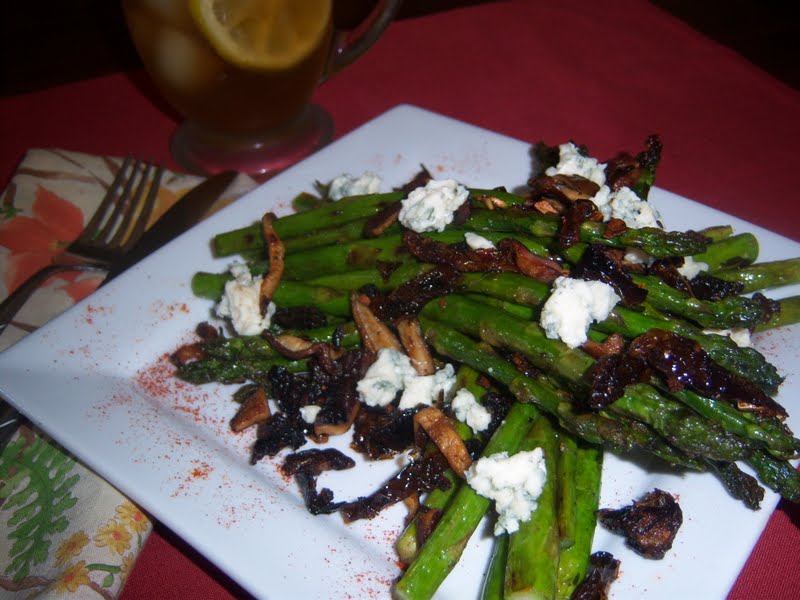
I also tipped the plate after this, to drain off the rest of the broth. When cooled a little bit, plate and drizzle with extra virgin olive oil. The results?


The flavor was amazing! AND.....I will never spend five dollars for a jar of grape leaves, again! The texture was spot on, and will probably get even better, when stored overnight with a little olive oil on top, like this...


Three more of those were eaten before I could bring myself to put it in the fridge...they're addictive! Please leave a comment with your email address (unless I already know you), if you'd like this incredible recipe. I'm quite certain that these could be made with nutritious brown rice, quinoa, couscous, or bulgher wheat as well! My only concern is that I have so much of the delicious filling left....hmmmm....that Napa cabbage innocently sitting in the fridge begging to be stuffed is where I will go with that extra, delicious mixture. I'll post a photo of it, and let you know how it tasted!  This, however was simply wonderful!  What did Kitchen Angel think?  She was out in the garden, trying to be "Pixie's Little Helper", and I had to teach her the patience involved in waiting for a green bean to become full-size!


Patience, my dear! Eat well (and inventively), my friends. Love and kindness to all,

                                                                           Pixie

Monday, June 20, 2011

Tweakage

As you may know from previous posts, I am not a "tweaker", or one of those who strays too far from an actual recipe. Until recent years, that is. I finally trust my 30-plus years of cooking experience, and taste preferences enough to "tweak" (gosh I love that word), or change recipes...to suit tastes, textures, or even quantities. Such is the case with a favorite Spring/Summer recipe I enjoy. It's Aaron McCargo Jr's.' Asparagus and Sun-Dried tomato salad recipe. Go here to get ye a copy. Here's how I TWEAK it both to my tastes, and for more convenience whilst cooking it.

First, as always, get your ingredients together. Clockwise from lower left we have; sun-dried tomatoes, crumbled blue cheese, vegetable oil, fresh asparagus, pepper & salt, shittake mushrooms, and garlic, rosemary and thyme.


First, I soaked the dried tomatoes and mushrooms in hottest tap water to reconstitute...small ramekins are enough room for this...


Then, I rinsed the asparagus, and cut off only the very toughest part of the ends. I saved these in a small plastic resealable bag for soup stock, or to toss in the compost pile, dependant upon the lazy-o-meter on that particular day.


While the asparagus drained on paper towels, I got busy chopping the garlic and herbs, and slicing the tomatoes and mushrooms. Preparation is key in this recipe as well - you don't want that beautiful, tender, and expensive asparagus to burn because you had to chop something mid-stride! Here it all is, post prep....


Now is the first change I make to the way the recipe is written. The author has you tossing the asparagus in a bowl with the garlic, herbs and seasonings. I tried it that way the first time...and all of those lovingly chopped herbs and garlic and what not, did not stick to the asparagus! Think about it...you are tossing something as straight as a stick, in a concave bowl...it made no sense! So.....I put me Pixie-cap on, and realized that my appetizer tray was the perfect tool for the job...see?


The asparagus were able to roll around in the oil/herb/garlic/seasonings mixture, and actually stay in contact with it all! See that bit o' tweakage? Then, I lightly oiled my grill pan, and set the flame to 4 or 5 - not too hot, as I don't want a smoke-filled kitchen, or to burn the tender vegetable. That's another difference from the author's recipe - I grill them for much longer than 4 minutes a side. One should grill them until they are tender, and have light grill marks on them (on a stove-top grill pan). Mine took about 8 minutes a side. Here they are, in as close to a single layer as I could get, starting the process.


Another major, but significant difference...when the asparagus are done, I set them aside to cool down, and simply add the rest of the herb oil to the grill pan, to saute' the tomatoes and mushrooms in. Why should I dirty another pan just to crisp them up, and get them ready for the salad? Here they are, once the asparagus was removed - this only takes another five minutes....adding the oil from the appetizer tray first, of course...


Sun-dried tomatoes and shittake mushrooms (both have been soaked, squeezed dry, and sliced into strips)...


The results? Well, with a glass of freshly-brewed, lemony iced tea, this was a delightful late Spring/early Summer lunch!


I garnished the plate with a few sprinkles of cayenne pepper for a little zing, and squeezed a wedge of lemon over the top, to brighten up the flavors that otherwise may have been too rich, and also topped with (not in the original recipe) crumbled blue cheese. All three of those last items were tweaks to the recipe, as you will see when you read it.  Here's a close-up, showing you the textures in this dish that I adore; meaning....the tender asparagus, sweet, chewy sun-dried tomatoes, delicious shittake mushrooms, and meltingly good blue cheese.  Did I mention that there's garlic involved?


I love this salad for all of the above, and more. Eat well, my friends, and stay tuned for that (very much postponed) Rubber Chicken finale, and a Summer visit with Kitchen Angel! Remember, don't be afraid to change a recipe! The difference may be just what it needed! Love and kindness to all,

                                                                           Pixie

Sunday, June 19, 2011

Happy Father's Day, Dad

You have been gone from our lives for almost thirty years, now. I was not quite twenty three years old that year. We had a turbulent relationship.....Mom said it's because we were both stubborn, and smart. We shared a love of fishing, ribald jokes (and language) and Johnny Carson. The most valuable things I ever learned from you, were;

1. Patience. If we had to sit out, in our boat, on a blazing hot South Florida day for five hours before the first fish would bite - that's what we'd do.

2. Perseverence. Never, EVER  give up. Period. Life is too short to be a coward, or a weenie. Be brave, and try new things.

And the last, indelible thought, and Dad repeated this one all the time....."The world does not owe you a living", you must learn to take care of yourself, and never depend on others to take care of you".

I now know that Dad was trying to teach us all independence. And while, I may have occasionally leaned on others for support, I know I could support and take care of myself, physically, mentally, emotionally and financially. It would be hard - nothing worthwhile in life is easy...but it would be so worth it!

Thank you Daddy, rest in peace.

Your Daughter, Allison (Pixie)

Tuesday, June 14, 2011

Productive Pixie-Patch!

It's finally summertime! All of the hard work of digging, sowing seeds, and transplanting young and tender seedlings is almost done. Many have asked me to show where the garden is now, and so.....buckle up, here we go! I like to grow many different kinds of vegetables, with succession planting, so that an empty space is not empty for too long, and with an eye toward variety. I never met a vegetable I did not like, so here's the tour/garden party for you.

Radishes...before the harvest....


And after......


Okra seedlings, just getting their start before the real heat of summer is here...


The carrot patch - the first of multiple sowings, as I like to have fresh carrots being pulled right up until frost...


Some romaine and butter crunch lettuces - almost ready now..


Green beans for canning, freezing, but mostly eating fresh, moments after picking...


Some beautiful herbs to cook it all with...clockwise from lower left, thyme, tarragon, cilantro, dill, oregano and basil...


A variety of onions, red, white and yellow.....


A summer staple for salads and Gazpacho...cucumbers..


And of course, one zucchini plant, and one yellow squash plant. They are highly prolific, and I do not need a lot of those plants...


One of my personal must-haves in the garden....broccoli....


Another summer staple, bell peppers..


And the star of any one's summer garden show....tomatoes...the first ones will be ready before the end of June!


On the fencing behind the tomatoes, I have sugar snap peas climbing...I cannot wait to use them in a stir-fry..


The whole plot after a weeding and watering session.....


I love the fact that I am going to be eating produce that was never touched by a chemical! What kind of pickled delicious-ness will I get up to with those radishes? What did Kitchen Angel think of all this impending bounty?  Well, she actually pitched in and helped with the harvest!


Stay tuned for what we will do with all this lovely vegetation, the Rubber Chicken finale...and my attempt at potato-wrapped cod! Eat well, my friends, and enjoy the bounty that is summer! Love and kindness to all,
                                                         
                                                                             Pixie